HM pH meter Model pH-80
Before you start using pH-80
Your HM ph-80's sensor must be wetted in the electrod storage solution for at least fifteen minute prior to use. This solution is inside the large Mylar packet(included). Simply pour this solution into the caps, so that the sponge is moist. Excess solution can be poured out. Insert HM pH meter model pH-80 into the cap and stand upright for fifteen minute.
The smaller Mylar packet contain a 7.0 pH buffer powder to be used for calibration. Mix the contents of the packet with a hundred millilitre of distilled water. When stored in a sealed container, the solution last approx. two to four weeks. Additional pH buffers(PH-BUF) and storage solution (OP-STOR) are available for purchase from your retailer.
Taking measurement on HM pH meter Model pH-80
1. Remove the cap. (Don't use the cap for testing)
2. Click the power button. The screen will display "PH" for a moment. Once "PH" changes to a number, your meter is ready for measurements.
3. Dip the meter's sensor into the water, liquid or solution to be tested.
4. Lightly swirl the meter to ensure the removal of air bubles or electric charges.
5. The meter will display a reading almost instantly. Keep the meter in the water until the reading stabilizes(up to thirty second, depending on the situation).
6. To view the reading out of the liquid, click the hold button. This will freeze the reading on the screen. Clicking HOLD again will release it.
7. Click the Power button to turn the meter Off.
8. Shake any excess water off the meter and rinse with low TDS water(Such as distill water, RO or DI), or use compressed air to clean it. Put the cap back on.
Please Note that : HM pH meter Model pH-80 is extremely sensitive in low conductivity water(below 10 microsiemens). If you use the meter in such water, It is better to test in flowing water, or swirl the meter continously while obtaining the reading. The reading will stabilize in ten to fifteen seconds.
Temperature and Switching Temperature modes.
1. The temperature reading is always displayed on the LCD panel(except in calibration mode), and is shown simultaneously with pH readings.
2. The default mode for temperature is Celsius. To Change the temp mode, quickly click the TEMP/CAL button to switch from celsius to Fahrenheit or Vice versa.
How to Calibrate HM pH meter Model pH-80
Proper Calibrate of you pH-80 meter is essential for accuracy and performance. Your meter was factory Calibration for pH 7.0 as a convenience for your first few uses. Calibrate your meter to a level that is close to what you will be testing, or in the center of a range. You pH-80 should be calibrated at least once per month. The pH-80 meter features auto-calibration to pH 4.0, 7.0 or 10.0
1. Turn HM pH meter Model pH-80 on and insert into a pH buffer solution of 4, 7 or 10. If your meter shows the correct reading, Stop here. If not, press and hold the CAL button for ten seconds. The display will flash and the temperature reading will change to a Flashing "CAL" image.
2. Select your desired calibration level(4, 7 or 10) by clicking the UP or DOWN buttons(indicated by the arrows). The measurement will change and a small icon will indicate the value. When the number matches the solution, click ENTER.
3. "CAL" will flash as "C--CA--CAL" indicating progress. Allow five to sixty seconds, don't press any buttons, and if possible, do not move the meter.
4. When the meter is calibrated, "End" will flash and the measurement will reappear.
Changing the Batteries.
When the meter displays a flashing battery symbol, your batteries are getting weak and should be replace soon. To change the batteries:
1. Pull out the orange batterry compartment using your thumb nail.
2. Remove the three batteries.
3. Insert new batteries in the direction as depicted inside the compartment. The flat side of the battery is the positive(+) side. The meter uses 357A batteries.
4. Close the batteries compartment. Make sure it is tightly closed.
Temperature Calibration
If you need to calibrate the PH-80's thermometer, only calibrate it in the air to a different, correct thermometer.
1. With the meter off and in the air, press and hold the power and temp buttons at the same time for five seconds.
2. 'CAL' and the temperature will flash on screen.
3. Using the Up or Down buttons(arrows),adjust to the correct temperature.
วันพฤหัสบดีที่ 23 กรกฎาคม พ.ศ. 2558
วันอังคารที่ 14 กรกฎาคม พ.ศ. 2558
Salt Check Tester model SB-2000Pro Manual(With Pictures)
Specification of SB-2000Pro
Model : Gimisanggung Pro(SB-2000Pro)
Measuring Method : Intelligent automated measurement
Measuring Range : 0.01 to 10.0 percent
A.T.C: 0 degree celcius - 98 degree celcius(0.01 - 5.0 percent)
0 degree celcius - 80 degree celcius(5.1 - 8.0 percent)
0 degree celcius - 40 degree celcius(8.1 - 10.0 percent)
Resolution : 0.01 percent(0.01 - 2.99 percent)
0.1 percent(3.0 - 10.0 percent)
Accuracy : 0.01 - 2.00 percent(+/- 0.1 percent)
2.01 - 3.00 percent(+/- 0.2 percent)
3.1 - 5.0 percent(+/- 0.3 percent)
5.1 - 10.0 percent(+/- 0.5 percent)
Auto Shut-Off : After 30 seconds, Power-saving features.
Temperature Compensation : Automated(ATC) to 25 degree celcius
Display : LCD Screen
Automatic Power On : Power turns on automatically if the object is sensed
Completion Function : Data value is fixed automatically after measurement
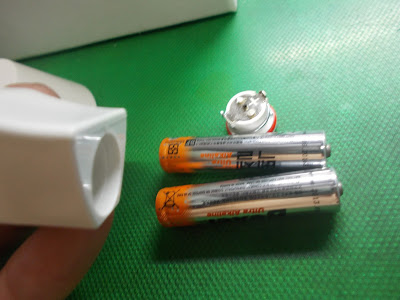
Power Source : 2 x 1.5V bateries (Include AAA type batteries)
Housing : Daily life waterproof
Dimensions of this meter : 25.0 x 24.6 x 170(mm.)
Weight : 64.8 grams(Include batteries)
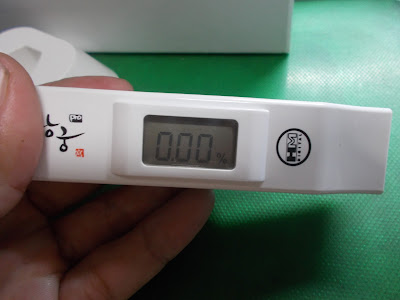
LCD Display
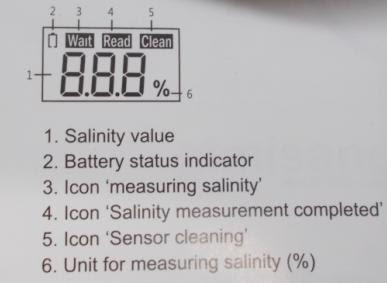
1. Salinity value
2. Battery status indicator
3. Icon "measuring salinity"
4. Icon "Salinity measurement completed"
5. Icon "Sensor cleaning"
6. Unit for measuring Salinity(%)
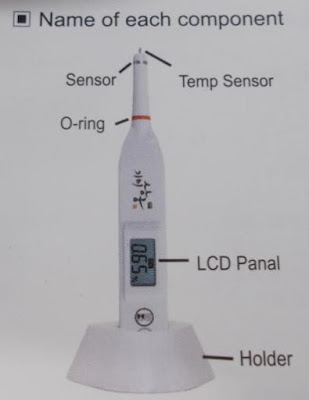
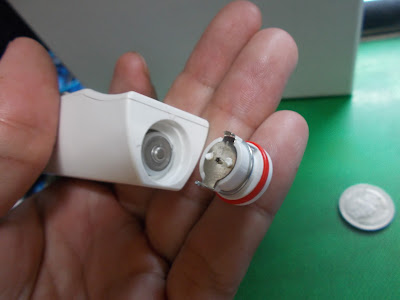
Name of each component
How to Change the Battery
Change Battery when LCD display battery replace indication Change battery before to "Lo" sign in display which indicates unable to measure due to low battery level.
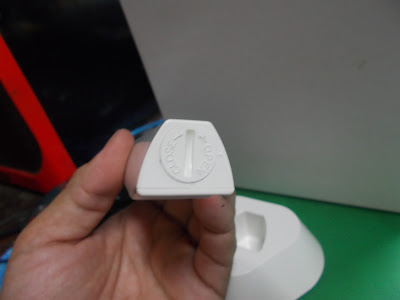
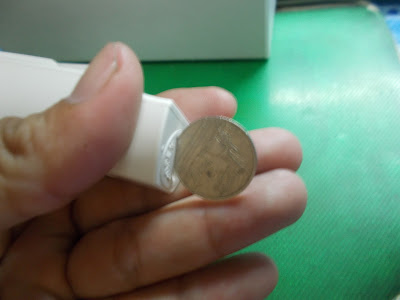
1. Use a coin to turn the battery cover 90 degrees counterclockwise.
2. Remove the batteries inside.
3. Get two AAA batteries. The + side should face towards the top lid.
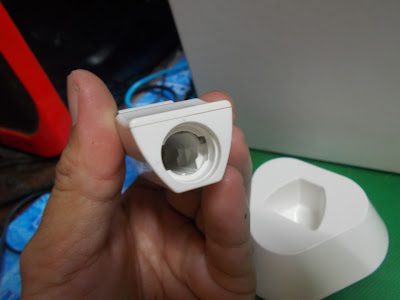
4. Use a coin to rotate 90 degrees clockwise in order seal the battery lid.
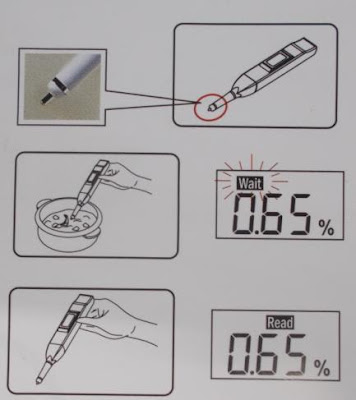
How to use or How to measure by SB-2000Pro.
1. Before usage, be sure to clean the sensor tip with a soft cloth.
2. Stir the testing liquid at least once before inserting the sensor tip.
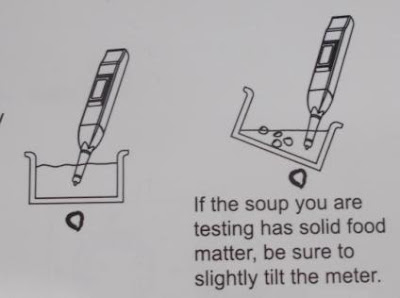
** After placing the sensor tip into a sample of soup to be tested, be sure to not touch any solid food matter inside the soup.(Contact with solid food matter will likely cause an error in salinity reading)
3. When the reading is completed, the sensor will vibrate are "READ" indicate on the screen. At this point, remove the sensor and read the measurement.
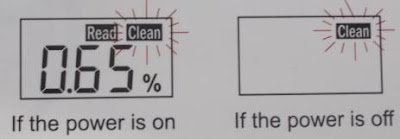
4. If any of the tested liquid is left on the sensor, a measurement error can occur, causing the sensor to continuously flash. When this occurs, clean the sensor with a soft, moistened tissue for an accurate reading.
** When the indicator flashes "CLEAN", the sensor's function to automatically test for salinity will not work temporarily.(When this occurs, please clean the sensor with a soft moistened tissue).
5. After using SB-2000Pro. Be sure to clean with a soft, moistened tissue; rinse and wipe with a tissue.
** Caution in measuring
Like the diagram to the right, be sure to submerge the Digital Salt Tester at least 0.5 inch(or 1 cm.) away from the surface bottom.
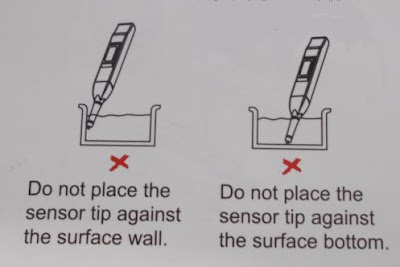
Be sure to plunge at least half of the sensor's tip.(Be sure to not touch any solid food matter)
** Caution in handling
When testing a soup that is being boiled, the measurement can be inaccurate because of the continually changing temperature.
Putting SB-2000Pro in dishwasher will likely cause damage. Do not plunge the Digital Salt tester into water.
Please be aware that the digital Salt tester can malfunction due to exposure to heavy shocks and water damage.


SB-2000Pro Available at this seller.
Model : Gimisanggung Pro(SB-2000Pro)
Measuring Method : Intelligent automated measurement
Measuring Range : 0.01 to 10.0 percent
A.T.C: 0 degree celcius - 98 degree celcius(0.01 - 5.0 percent)
0 degree celcius - 80 degree celcius(5.1 - 8.0 percent)
0 degree celcius - 40 degree celcius(8.1 - 10.0 percent)
Resolution : 0.01 percent(0.01 - 2.99 percent)
0.1 percent(3.0 - 10.0 percent)
Accuracy : 0.01 - 2.00 percent(+/- 0.1 percent)
2.01 - 3.00 percent(+/- 0.2 percent)
3.1 - 5.0 percent(+/- 0.3 percent)
5.1 - 10.0 percent(+/- 0.5 percent)
Auto Shut-Off : After 30 seconds, Power-saving features.
Temperature Compensation : Automated(ATC) to 25 degree celcius
Display : LCD Screen
Automatic Power On : Power turns on automatically if the object is sensed
Completion Function : Data value is fixed automatically after measurement
Power Source : 2 x 1.5V bateries (Include AAA type batteries)
Housing : Daily life waterproof
Dimensions of this meter : 25.0 x 24.6 x 170(mm.)
Weight : 64.8 grams(Include batteries)
LCD Display

1. Salinity value
2. Battery status indicator
3. Icon "measuring salinity"
4. Icon "Salinity measurement completed"
5. Icon "Sensor cleaning"
6. Unit for measuring Salinity(%)
Name of each component


How to Change the Battery
Change Battery when LCD display battery replace indication Change battery before to "Lo" sign in display which indicates unable to measure due to low battery level.


1. Use a coin to turn the battery cover 90 degrees counterclockwise.
2. Remove the batteries inside.
3. Get two AAA batteries. The + side should face towards the top lid.
4. Use a coin to rotate 90 degrees clockwise in order seal the battery lid.
How to use or How to measure by SB-2000Pro.

1. Before usage, be sure to clean the sensor tip with a soft cloth.
2. Stir the testing liquid at least once before inserting the sensor tip.
** After placing the sensor tip into a sample of soup to be tested, be sure to not touch any solid food matter inside the soup.(Contact with solid food matter will likely cause an error in salinity reading)
3. When the reading is completed, the sensor will vibrate are "READ" indicate on the screen. At this point, remove the sensor and read the measurement.
4. If any of the tested liquid is left on the sensor, a measurement error can occur, causing the sensor to continuously flash. When this occurs, clean the sensor with a soft, moistened tissue for an accurate reading.
** When the indicator flashes "CLEAN", the sensor's function to automatically test for salinity will not work temporarily.(When this occurs, please clean the sensor with a soft moistened tissue).


5. After using SB-2000Pro. Be sure to clean with a soft, moistened tissue; rinse and wipe with a tissue.
** Caution in measuring
Like the diagram to the right, be sure to submerge the Digital Salt Tester at least 0.5 inch(or 1 cm.) away from the surface bottom.

Be sure to plunge at least half of the sensor's tip.(Be sure to not touch any solid food matter)

** Caution in handling
When testing a soup that is being boiled, the measurement can be inaccurate because of the continually changing temperature.
Putting SB-2000Pro in dishwasher will likely cause damage. Do not plunge the Digital Salt tester into water.
Please be aware that the digital Salt tester can malfunction due to exposure to heavy shocks and water damage.


SB-2000Pro Available at this seller.
วันจันทร์ที่ 13 กรกฎาคม พ.ศ. 2558
CDN TT1 Thermometer manual
Digital Tea Thermometer and Timer
Model CDN TT1
Fourteen – Two hundred and twelve degree
fahrenheit or minus ten to one hundred degree celsius Get Professional Results Every time.
Designed for
precision, CDN TT1 is perfect for eighteen types of loose, ball or bagged tea.
You can use this CDN TT1 thermometer to determine the exact steeping temperature
of the water. Then you can easily choose from eight tea strengths. Simply
choose between Fahrenheit and Celsius.
You can choose the
type of tea and the strength desired. CDN TT1 thermometer has been pre
programmed with eighteen tea choices. The tea types include settings such as
Brozh, black, booln, chia, China, dajel, earl grey, fruit, gooln, green,
herbal, jadeo, japan, jasmine, pooch, peuht, roott and white. The perfect
steeping time is displayed with the water temperature until the audio/visual
alarm sounds.
Tea Tips : The size of the tea leaf has an effect on the
volume of tea. The general rule of one slighty heaped teaspoon of tea per cup
should be adjusted to the weight of 0.06 ounce / 1.75 grams.
the Thermometer stem before each use is important. Very
important Do not use CDN TT1 thermometer in microwave.


วันอาทิตย์ที่ 12 กรกฎาคม พ.ศ. 2558
Wood Moisture Content Rate
Moisture wood moisture meter is one of instrument use for measure the amount of water in the substance. This information can
be used to
determine whether the material
is ready for use or not. Unexpected more or less moisture in substance is need for further
inspection.
Wood product also paper product are very very sensitive to humidity. Their physical properties are strongly dependent on moisture content.
Logs with new cut possible have a moisture content (MC) more than 80 percent, depending on what species are.
Wood Moisture Content Rate(WMCR)
What is Wood Moisture Content Rate?
In many country, the rate of water weight contained in the wood to the weight of absolute dried wood is defined as WMCR or so call wood moisture content rate. The WMCR varies with the different tree and different part of a tree, for instant the red pine's WMCR at the core is 70 percent and 200 percent at the edge. The same tree from different region also makes the WMCR different.
What WMCR is suitable for deep process?
Under certain environment for a long time, The WMCR comes to a steady value which is refered to as balance WMCR under the environment. When the WMCR is above the value, the wood will gives off the moisture and contract, but if WMCR less than the value, it will take in the moisture and inflate. High WMCR of the wood may result in loose glue connection and distortion after process. Different region and different purpose requires different on WMCR of the wood. The natural balance WMCR of the wood is between 7 percent to 18 percent which has become the check point in wood products manufacturing. Additionally, you can measure the WMCR of given stardard wood, then compare it the WMCR of the wood to be tested.
What is balance WMCR?
Under a given air condition, the final WMCR or say steady WMCR is refered to as balance WMCR(Steady water content state). The year average WMCR of some country is shown as table
How many method are there to measure the WMCR?
There are drying method, electrical method, Carbonization method, tritation method and humidity method for measuring the WMCR. Drying method and electrical method are normal adopted in production process. The drying method that calculating the weights of a wood before and after being absolute dried has high precision but takes considerable long time and complicated, it is usually adopted in laboratory. While the electric method base on some electric properties of a given wood that varying with the water content in the wood is being adopted to measure the WMCR in mass production this method has lower precision compared with the drying method, but still be able to meet the normal production process requirements.
How to measure the WMCR of a wood exactly with the unit?
As shown below, Just follow the following rules to measure on a newly cut wood or the latest texture.
1. cut the wood in direction vertical to the horizontal texture of the wood.
2. Do not measure with the skin of the tree.
3. Do not measure along the round texture side.
4. Do not measure along the straight texture.
Why are there different results measured by different manufacturers of diffenrent type of moisture meters? The electrical properties of a given wood varies with the trees, temperature and regions, and most products can not set every modified value for each tree, only one certain tree and temperature can be used as modification ground, this is the reason that different results came out.
Will Low battery affect the measurement result?
When the battery power is less than 70 to 80 percent the measurement result becomes decrease. For instant, at normal voltage the moisture meter measured reading is 14 percent, but when the battery power is less than 70 percent the measured reading might show 11 percent or even less on measuring the same wood. So once moisture meter the low battery indication displayed on the LCD, the best thing to do is replace a new battery to ensure the accuracy of measurement.
สมัครสมาชิก:
บทความ (Atom)